Showing posts with label Silver. Show all posts

Thursday, 3 January 2013

Chromed and Bejeweled


Happy New Year everyone! Bring on 2013, I hope it's going to be a good one! We didn't really party this new year's eve but did go to a friend's house for some dinner and drinks. I still had to do some sort of celebratory mani to ring in the new year. Plus, this polish completely matched the metallic silver pumps I wore.

I chose a simple mani, mainly because I didn't have a lot of time to do my nails. I enjoyed wearing this colour on it's own so much (I had only ever used it for nail art before), that I still have it on today! I just love how metallic silver looks irl, which is strange for me because metallic is usually my least favourite type of polish.

2 coats of Stargazer Chrome Silver 232 and two coats of Milani Jewel FX in Silver on the ring fingers.
Pin It

Wednesday, 29 August 2012

Layla - Ocean Rush

For as much as I love them, I hardly ever use my holos, even in the summer because it's so hard to actually get a sunny day to coincide with me having the time to paint my nails. As strange as that sounds, it's painfully true. So I was quite impressed when a friend from Instagram told me she swatches her holos at night, under her lamp as she does with any other polish and the holo effect still shows as vividly.

I can't say if this is the case for every brand (I will most definitely put it to the test) but it's definitely true of this Layla Hologram Effect. I was so impressed the linear holo effect shows indoors under my lamp, hmmm, why didn't I think of that before? It makes sense!


I wore Ocean Rush with no base coat as I don't own any holo-compatible base coats and it was quite tricky to apply. Nothing too bad that a second coat didn't fix. I was also afraid a top coat would kill the linear holo effect but it didn't seem to make a difference (at least with the top coat I used, CND Speedy).


I tried adding some sort of nail art over it but gave up after a while and just added some silver chevron french tips. I didn't like the overall look as the chevrons blend in too much with the blue polish so I removed the whole mani this morning. Sometimes a pretty polish really does need to be left alone.
Pin It

Saturday, 28 July 2012

Boyish Chic Polka Dots & Bows

Today I have yet another review for you guys - Born Pretty m-59 stamping plate. I find this plate, consisting of cute bows, hearts and snow flakes very versatile, probably because it has some of my favourite images. It's round and the same size as regular Konad or Bundle Monster plates (unlike the m71 which is the only other Born Pretty plate I've tried).

As you'll probably know from my previous review, I have had good experiences with Born Pretty stamping plates although I have purposely chosen small picture plates as opposed to full nail plates to avoid problems with image size and full nail coverage, etc.


The images are well engraved and detailed, thus transfer with ease onto the nail. This plate retails for $2.99 and I would definitely recommend if you are looking for a cheaper alternative to Konad. To purchase this plate or any other items on the Born Pretty online store, you can use my discount code - VA7J61 - to get 7% off.

The base colour for this mani is OPI I Don't Give A Rotterdam which I received in a swap. This grey toned muted periwinkle packed with silver glass fleck shimmer was my favourite colour from the Holland Collection. For some reason it looks much more grey'ish than blue on me so I shall have to use 3 coats next time.

I used the polka dot image on the plate and kept with the theme on the remaining nails too. To keep the mani quite soft and subdued, I chose a complementing silver polish - Barry M Silver Foil. I liked the final result of contrasting feminine and masculine qualities - bows and polka dots yet they look boyish and muted!


Pin It

Sunday, 3 June 2012

Asymmetric Periwinkle Bandit

As I haven't done a scotch tape mani in a while and today I had a little extra time on my hands, that's exactly what I went for. I should probably have the Union Jack or some sort of red, white and blue on my nails today since it's the Queen's Diamond Jubilee but to be honest, we're not really celebrating. In fact, we are going to the theatre to watch Rock of Ages, hopefully it's a good one.

Today's design is inspired by one of my favourite girls on IG, Nicole. If you have an IG account and want to follow her, search @nic_tchelly.

I started with Collection 2000 BMX Bandit which is a periwinkle blue much like CG Secret Periwinkle and Essie's Lapis of Luxury. Collection 2000 is usually a shelf I don't go near when I am in Boots but every now and again they do put out a mini collection that has some amazing colours. BMX Bandit (I love that name) is part of the Dynasty, Hoola Hoop, Wham collection which has been around since circa summer 2009 but I still love it.

For the asymmetric lines I also used Zoya Trixie which is one of my favourite silvers and the black with blue micro glitter is a franken I made a while ago called Starry Midnight Sky.


And here is a look at BMX Bandit on it's own! Isn't it beautiful? And gotta love the price too, £1.79 or 2 for £3!

Pin It

Sunday, 20 May 2012

Chromatic Pastels

Back in November, I posted this mani called "Chromatic Neon Dots". A metallic foil base topped with colourful neon dots. Since then, I've received a lot of positive feedback on my IG feed for this mani so I decided to recreate it but this time with softer pastel dots.

I still prefer the way the neon dots look against the silver, they are obviously much brighter and stand out more but it's toned down cousin isn't so bad either.

I used Stargazer Chrome Silver #232 for the base and the dots are a mixture of pastel coloured polishes ranging from Jessica Samba Parade to Barry M Lemon Ice Cream, to Rimmel London Misty Jade.


(Haha, the reflection on the bottle...me in my house sweater! Lol!)

Thanks for reading and commenting :) Pin It

Thursday, 17 May 2012

Silver Glitter French Mani & Born Pretty M71 Plate Review

Today I have a review for you. The lovely ladies from the Born Pretty store offered me the chance to review their M71 stamping plate, which is most popular for the Hello Kitty image. However, for this reason I wanted to give one of the other images a go first and decided on one of the flowers and a simple french.

I used Kiko 209 for the nude pink'ish base, China Glaze Polarized for the slanted french tips and Barry M Silver Foil to stamp with.


Other than the plate, they sent me a stamper and scraper as well which can all be bought HERE for $3.49 (free shipping). The M71 plate has 9 small images consisting of various flowers/ plants, fruit, cat, dolphin, butterflies and the famous Hello Kitty.

As you can see in the picture below, the stamper is shorter than my Konad one but the diameter is only the slightest bit smaller, which shouldn't cause any issues when stamping.
The silicone bit is somewhat firmer than Konad which meant I had to apply a lot more pressure on it. I used it on a couple of nails but had to switch back to my Konad stamper because of this. I had no problems at all picking up the image, the firmness of the silicone just made it difficult to transfer onto the nail.

The scraper is also slightly smaller than the Konad one but the blades are the same. They both do damage to the plate which is the reason I often use a old credit card. 

Born Pretty plates in general, are a very good alternative to Konad as they are of good quality and at a fraction of the price.The store has an array of different plates to chose from and a whole lot of other nail art equipment and decorations. You can get 7% off if you use the discount code on my sidebar - VA7J61.

Pin It

Thursday, 22 March 2012

Hunger Games Capitol Colors - Stone Cold

Stone Cold is my last polish from the China Glaze Hunger Games Capitol Colors collection! Well, I also got Luxe & Lush today but you will be seeing plenty of that one over all sorts of colour in the weeks to come!

Stone Cold (District 2 Masonry) was one of those polishes I wanted without a shadow of a doubt when I first saw swatches of the collection! I love matte and this colour is so androgynous and "badass". It reminds me of a black chalkboard! A chalkboard packed with silver shimmer - did you have those in school? Lol...only joking!

I've never really had much trouble with any of my matte formulas but this is the best formula I've worked with in a matte polish! It's so pigmented you could get away with one coat.

I stamped some silver chains (BM12 and Barry M Silver Foil), to keep with the theme of the polish. You can see how a top coat also transforms this polish and brings out all that silver shimmer.

Pin It

Saturday, 3 March 2012

Foil Leopard

Leopard time again!

This mani was done using two Barry M polishes - Instant Nail Effects Gold and Silver foil! It's inspired by a mani that Deniz posted on her "My365" calendar on 29th Jan! The contrast between the two foil colours isn't as obvious as a dark and light colour would create but it actually looks kind of "spacey" irl!

Pin It

Thursday, 1 March 2012

Dotted Tristam

I'm eagerly awaiting the arrival of St George and Dragon which should be here tomorrow (hurry up Royal Mail!), so in the meantime as we had an inkling of sunshine today, what better way to welcome the 2 new pretties into my collection that to adorn my hands with Tristam!

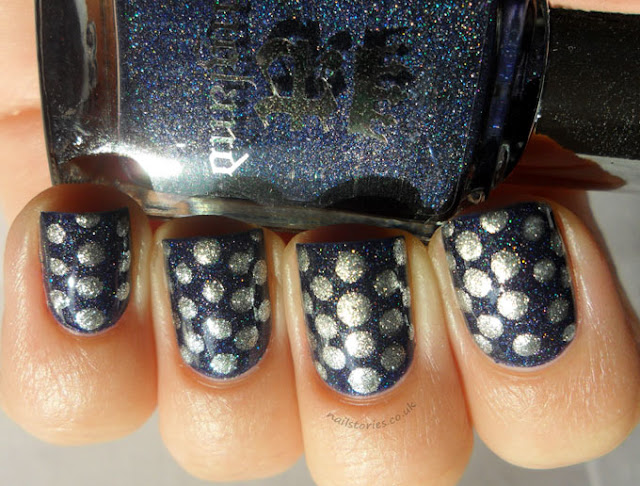
Tristam, from The Mythicals collection is a deep blue packed with a ton of holo micro-glitter! There isn't really anything I can say about this polish that hasn't been said all over the blogosphere! For many of us it was THE polish of 2011 and a must have!


Here is Tristam dotted with Zoya Trixie and on it's own! And check out the " A la Glitta Gloves" hand positions on the pics! It was the only way my hand didn't look weird in direct sunlight!


And a somewhat blurry picture showing all that holo goodness:
Pin It

Wednesday, 25 January 2012

French Twist

This morning on the train, I saw a girl wearing gold nails with black tips. I see her every now and then on my way to work and she always has impeccable nails. I wonder if she is a blogger or something?! I'm too shy to ask! Lol!

Anyway, back to my point. I'd forgotten how much I actually like french tips of various colours. It makes for a simple yet fun mani.


I used Barry M Silver as a base colour. This isn't the best silver I've tried. In fact, it's below average. On the brush, the micro glitter is plenty and quite densely packed but it doesn't translate to the nail (not the same calibre as Zoya Trixie which is my favourite silver). I used 3 coats and there was still some sheer patches.

Drying time was horrible, even with a fast dry top coat (or maybe I'm just too impatient). Because of this, I dented my ring finger and had to try and cover it up with another coat. My other Barry M polishes are much better than this so I guess it's just this particular one that's problematic. The black tips are Barry M Black.


Do you guys like french manicures of various colours as well or are you a traditional french manicure kind of person? I like both to be perfectly honest but traditional french is so unadventurous! I haven't done one in years so I might actually do one sometime soon :) Pin It

Tuesday, 29 November 2011

Chromatic Neon Dots

Today I have something a little more colourful and lively to show you. Not that the weather calls for it but I've had it on my list of manis "to do" for a while so why not do it on a super dreary, rainy day?

I first saw this mani on Mad Manis and Deniz also did an amazing version. The silver makes the look quite robotic and futuristic but the neon polka dots add a little fun to it. I had a little trouble keeping all my dots in line as I miscalculated the space still left on the nail. Random dots are so much easier to do!

I used 2 coats of Stargazer chrome silver #232 and various neon/ bright coloured polishes for the dots.


Lebowski hasn't made an appearance on here in quite some time, here is a recent photo of him playing with his snake (wow...that actually sounds quite dirty!)


Pin It

Tuesday, 11 October 2011

Starry Starry Lightning Bolts

This is my second attempt at recreating Jane's lightning bolt mani. Are her manis awesome or what?! My first attempt turned out crappy but hey! Learn from your mistakes! I get really lazy doing these types of manis because I have to wait ages for the polish to dry in between applying each layer to create the lightning bolt. It's definitely no quick mani!

I'm not 100% happy with this one either but at least I was able to do a double lightning bolt. The only problem really, was keeping the tape straight and on point enough to apply the 3rd polish layer/ 2nd part of the lightning bolt!

Tell me what you think! Are you guys patient enough to wait for these types of manis to dry?! I'm thinking maybe just accent finger next time! (Oops, and excuse the dry hands, I should know better!)


Pin It

Tuesday, 20 September 2011

A Hot Pink Chrome Leopard & A Snoozy Cat

I wasn't sure what to add to yesterday's Stargazer Chrome. When I'm in doubt of what to do or am lacking inspiration, I do leopard, Lol!

I used a Primark polish for the leopard spots. It's a hot pink with red undertones, the bottle has no name and a 001 number. It's my only Primark polish as I'm always afraid their polishes will lack pigmentation. I must admit this one is very good, I swatched it on my thumb and it was fully opaque in 2 coats!


The Stargazer chrome may look a bit too shiny in these pictures but that's because I added a coat of Barry M Silver to it as I showed you yesterday:


And here is a pic of Eggbert. When I got home yesterday, I found him snoozing in the bath tub! WTF?! My cats sleep in the weirdest places!

Pin It

Monday, 19 September 2011

Stargazer - Chrome Silver #232

Stargazer Chrome Silver was all over Ebay and Amazon in the last couple of years (I think it still is). I have heard many good and bad things about it so I wanted to try it out for myself and at £2.50 a pop, why not!

So, in a nutshell, these are the good and bad points for me:

Bottle - Love the mirror shine colour of the bottle but hate the shape! It's super hard to hold when trying not to make your fingers look all frumpy and ugly for the pics.

Application & Formula - I've read reviews where people have had trouble applying this over regular base coat as it drags leaving bald patches. I had no problem with this. It applied evenly over my base coat (CND Stickey) and with 2 thin coats I was left with a complete opaque coverage! It dries like a matte polish - very quickly. Be careful is you have ridges, this polish shows EVERYTHING! Even the slightest piece of dust will be magnified if trapped in this polish!

Colour - Silver metallic foil, like a nice piece of stainless steel, but it's not glittery or glossy as are some other metallics. This one is quite matte with only the slightest bit of shine.

Overall, I think it's quite good for the price! I can't see anything majorly wrong with it. Don't know what all the bad reviews were about! I think a lot of people were expecting it to look exactly like the colour on the bottle!


I then added a coat of Barry M Silver as I wanted to see what it looked like with a high shine to it. I like both looks but obviously the original look is more unique!
Pin It

Thursday, 11 August 2011

Pinkyberry & Old English Roses

Yesterday I showed you my first franken polish which I named Pinkyberry. As the colour is a cross between pink and a light shade of berry, it reminded me of old English roses painted on a porcelain tea pot :-)
I stamped roses using BM14 and Konad Silver stamping polish. The Konad silver and gold stamping polishes aren't as heavily pigmented as the other Konad colours, therefore not as good (imo) for stamping.


Pin It

Thursday, 5 May 2011

French Tips: Glittery Silver and Raspberry Parfait... Yum Yum!!!

Hi Everyone ;-)

Today's design is inspired by Erika's (http://chloesnails.blogspot.com/) scotch tape manicures. She is so talented and can create amazing things with a piece of tape.

Here is the base colour I used - CND's Raspberry Parfait:


I added a little "rhinestone explosion"  (at least that it what it's supposed to look like) to the ring finger as silver glitter and bright pink are quite funky colours themselves.


After I had done the first couple of tips, I realised that this silver glitter was probably not the best polish to go over bright pink. Although I love the colour combo, the silver glitter was quite sheer and needed way too many coats which is never good if you are doing a tape mani.

My tips didn't come out as crisp as I wanted as a result of this.


Next on the list, I have to try the patchwork mani.

That's all for now. Have a great day/ evening :-)

xoxo Pin It

Sunday, 1 May 2011

Nail Photo shoot 1 - Polka Dots & Rhinestone Black French Tips

Good morning all

Yesterday I joined forces with my cousin who is a make-up artist and a photographer. We used eyes/ nails or lips/ nails for the photo combos.

The model had very short nails so I had to use nail extensions on her (sorry some may look wonky but she had very small fingers and I only had certain sizes extensions).

I decided on 2 different looks. Polka dots (because I don't do enough of those) with a girly pink and blue barbie doll feeling and an edgy black/metallic with coloured rhinestones. The make-up and accessories we applied according to the nail polish colours.

Here are pictures of the hands only:


Products used:

- Jessica - Samba Parade (and I mixed in a few drops of CND Colour Raspberry parfait #519 to customise the colour. Don't worry, no polishes were harmed in this process).

- Barry M - Blueberry Ice Cream

- 17 Lasting Polish - Mini Skirt

I know most people change the design of the ring finger but on this one I decided to change the design of the middle finger !!!

Here is the photo after wardrobe and make-up was applied:

(please note that photoshop was only used on face skin and make-up, not on the nails)
  On the model's other hand I applied Metallic with black tips and a shatter effect on the ring finger:

I thought it looked a bit plain, so I added multi coloured rhinestones along the french tip line and vertically on the ring finger:


Products used:

- Barry M Nail Paint - Silver #288
- Barry M Instant Nail Effects - Black #311
- Rimmel London 60 seconds - Blackout #800

Here are the photos after wardrobe and make-up were applied:


Hope you guys enjoyed the photo shoot.

If you have any requests for a glossy photo shoot, please e-mail me - nailstories@hotmail.co.uk

xoxo Pin It
Related Posts Plugin for WordPress, Blogger...